Configurator
This article is going to help you setup the Configurator for Safewhere Identify
Launching the Configurator
The Configurator can be launched from Start >Identify >Safewhere Identify 5.0 Configurator in the Windows Start menu.
Set Up and Customize
Prerequisite
Initially, the Configurator checks that you have all prerequisite components installed on your server. If not, you must close the Configurator and install those missing components before trying again.
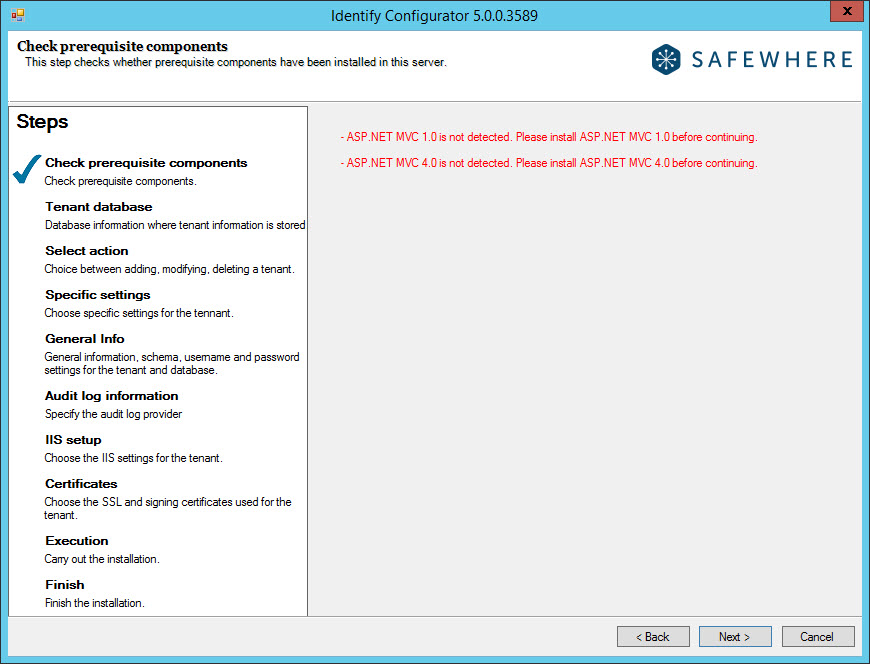
Note: For the version 5.1.0, we don't require ASP.NET MVC 1.0 and ASP.NET MVC 4.0 any longer.
Tenant management
The first thing to specify in the Configurator is the database server that is used to store the tenant management database. The tenant management database stores information on the settings of tenant installations—like version, tenant ID, whether the tenant is part of an NLB environment, and so forth.
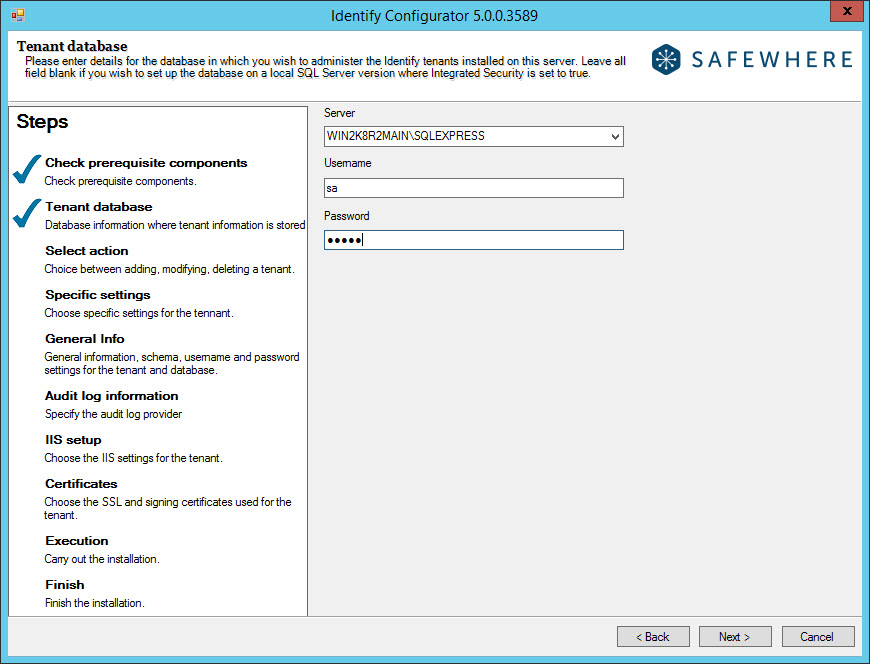
If you just want to manage this database on the currently used server, you can leave the server name empty.
If you want to set up the SQL server with Integrated Security, you do not need to input any information in the Username and Password fields.
If you have access to multiple SQL servers, you can choose among these from the Server drop-down or simply type in the SQL server that you want to use. Please notice that you might have to wait a little for those drop-down options to show up; it typically takes 10–15 seconds to find all servers in your network. If you are choosing a different server than the local one, you also need to specify the SQL server account for that database.
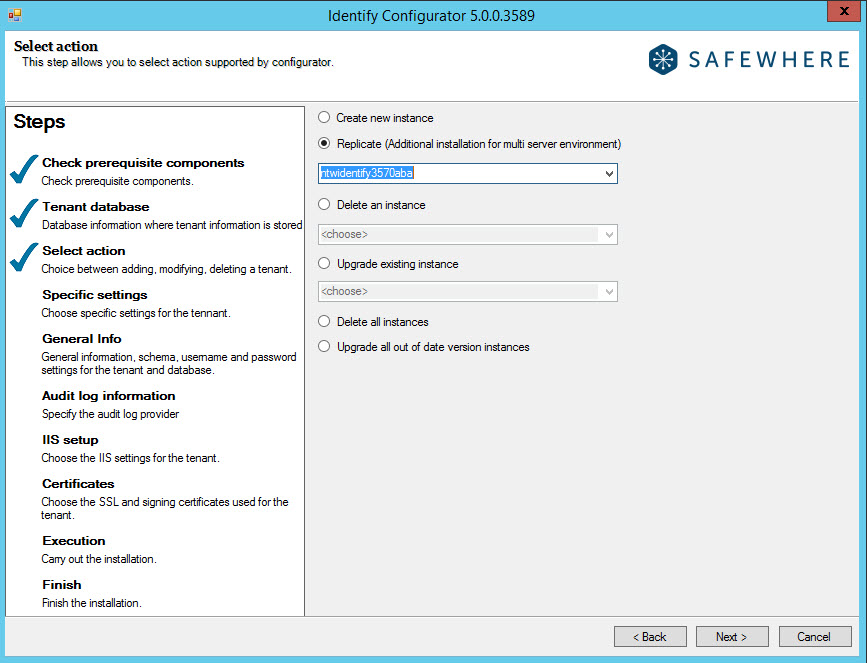
After specifying where the installation information of your tenant must be (or has been) stored, the system will be able to check if any tenant instances already exist. In the following step, it therefore offers a number of actions that can be taken on tenants, including creating, deleting, and upgrading them:
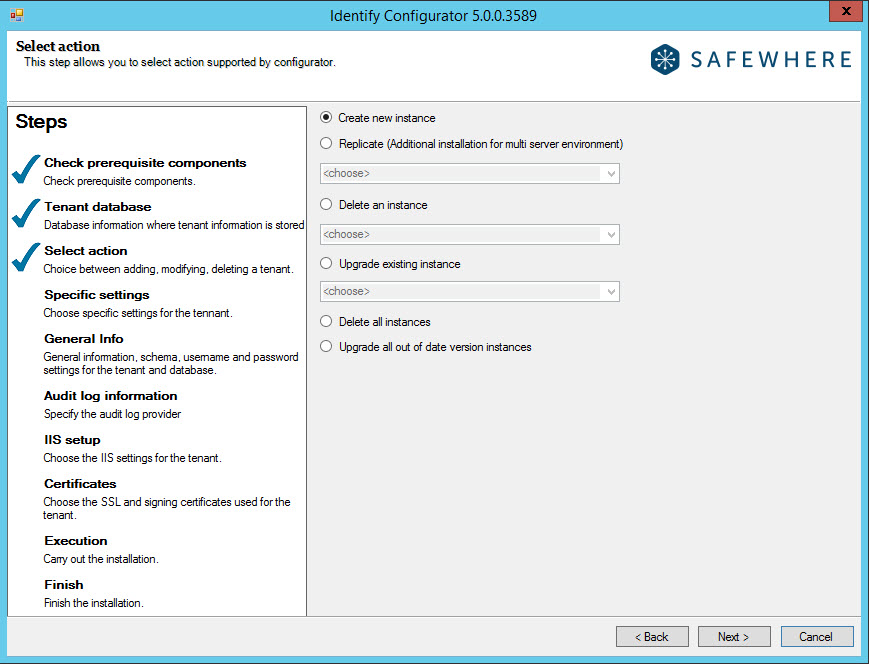
- Create new instance: Select this option when you want to set up a new tenant.
- Replicate: It is possible to install tenants in a load-balanced environment (on multiple servers). The process for this is simply to run both the installer and Configurator on another server as well. Make sure that you choose the same tenant management database on all servers onto which you install tenants (first step of the installer) because this database is used to ensure that individual installations of the same tenant can work well together and are using the same database. When you run the Configurator and it knows that you have tenants running on other servers than the current one, it proposes the option "Replicate." Simply choose the tenant that you want to make another installation of and the system will, during the next steps, ensure that you only update those settings that are allowed to be different between the tenant installations. For more information, please go to the Tenant Replication section.
- Delete an instance: Select this option when you want to delete one of the tenants already installed. The drop-down list identifies all those tenants found in the tenant management database specified in the prior step.
- Upgrade existing instance: If you have upgraded Safewhere Identify (which is done by running the system installer with a newer version of Safewhere Identify), then all tenants that have not yet been upgraded to this newest version are listed in this drop-down list. Simply choose a tenant to upgrade it to the newest installed version of Safewhere Identify. Notice that tenants have no problem running on older versions of Safewhere Identify, even when other tenants on the same installation might have been upgraded. Upgrading tenants from a working version always bares some risks of malfunction, so many companies choose not to upgrade tenants that are working well and do not require any new features.
- Delete all instances: Selecting this option is a quick way to remove all tenant instances instead of doing this one at a time using Delete an instance. This option is only available when there is more than one installed tenant.
- Upgrade all out of date version instances: Upgrade all tenant instances instead of doing this one at a time using Upgrade an instance. This option is only available when there is more than one installed tenant.
- Uninstall identify completely: This is basically the same feature as "Delete all instances." However, in addition, the Identify databases-Identify, Identify Audit, Identify Session, and Identify Cache-are removed when this option is chosen. This option is only available when no tenants are installed on a different server from the one running the Configurator.
Since both delete and upgrade actions will be executed immediately, the next part of this article will focus on explaining the tenant creation process. So let us assume that "Create new instance" was selected and the ‘Next’ button clicked.
Tenant creation
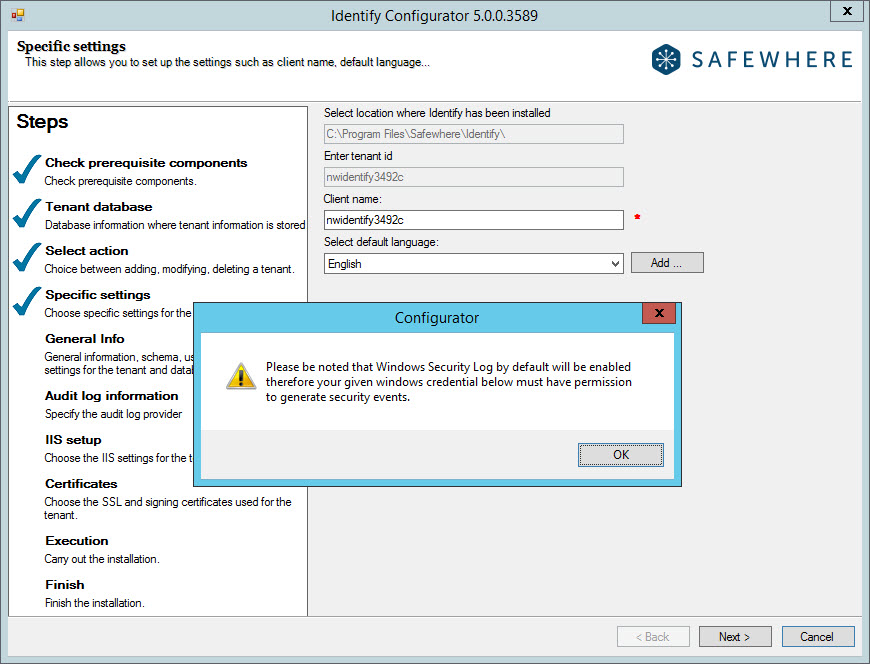
At the "specific settings" step, we specify the following info about the tenant id, client name and its default language which will be used for Safewhere Runtime:
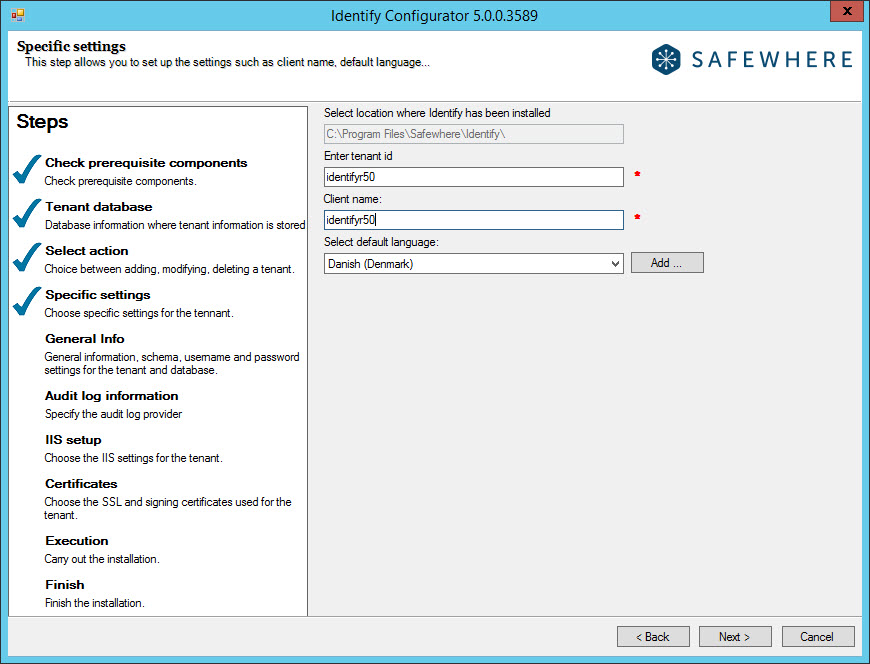
Enter tenant id: Specify the name you want the tenant to be known as. This ID is used in several places in the setup of the system, as proposed default values for domain name and application pool names. Because it will be used as a proposed name for the domain, you must not use spaces, symbols, or characters/numbers other than a to z and 0 to 9.
You can also add more languages to the default list by clicking the Add button.
At the next "General info" step, we will input:
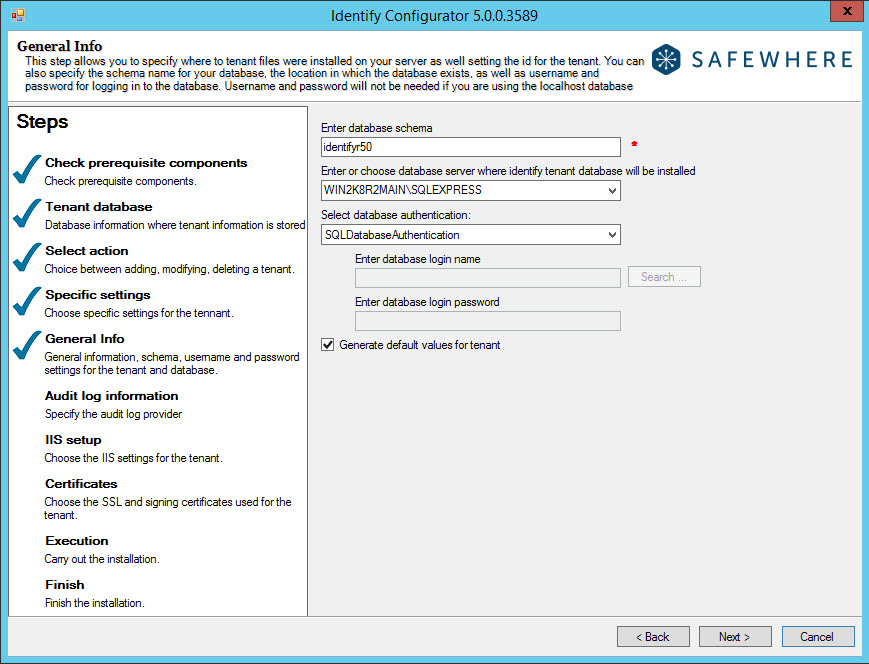
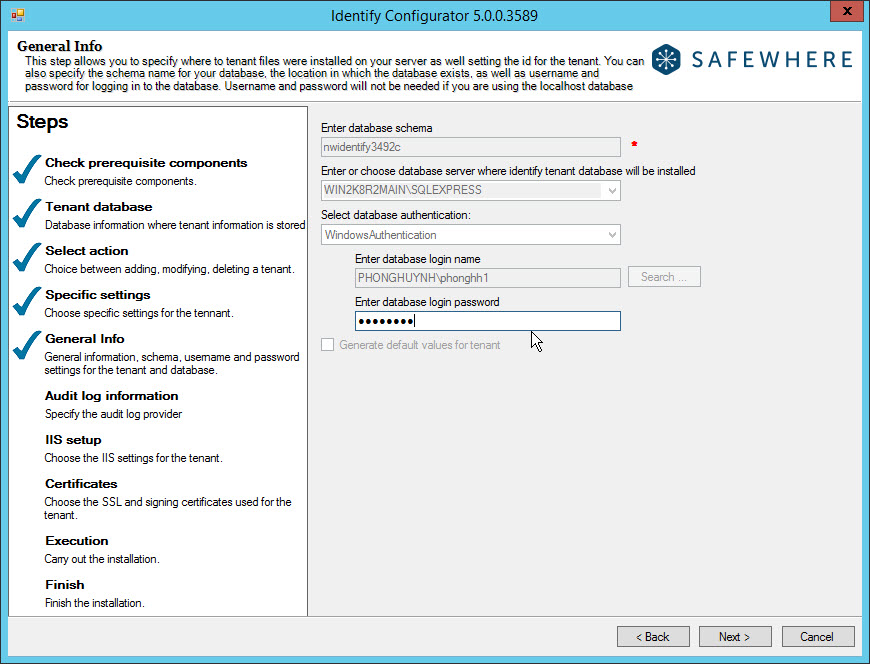
- Enter database schema: When entering a tenant ID, notice that the database schema is proposing the same name for the database schema. The database schema is the name that the tenant database will be saved as on your database server. You must not use spaces, symbols, or characters/numbers other than a to z and 0 to 9.
- Enter or choose database server where the tenant will be installed: If you just want to manage this database on the currently used server, you can leave this drop-down empty. However, leaving this field empty is not recommended because it means that you will not be able to replicate this tenant onto another server. Please notice that once you have clicked on this drop-down, you might have to wait a bit because it typically takes 10–15 seconds to find all servers in your network.
- Select database authentication: Specify the database authentication method. You can choose between SQL Server Authentication and Windows Authentication (Note: In case the database server you select is AzureSQL, only the option "SQL Database Authentication" is available)
- Enter database login name: Specify the username for the selected database server. If Windows Authentication is selected, the user is able to enter the username directly or find it using the Search button. For domain users, it should be in the format domain\user. If the user’s login credentials do not exist in the database, they will be added automatically. In addition, the specified user will be set as Identity for this tenant application pool in IIS.
- Enter database login password: Enter the password of the above user.
- Session state mode: Session state supports several different storage options for session data. And from the verion 5.0, we only have: InProc mode which stores session state in memory on the web server and this setting is not shown on UI any longer.
- Generate default value for tenant: This check box populates the fields in the IIS step of the Configurator with default values, which usually makes it easier on the user to insert the correct values. The default values are useful when you want to run a local test copy of the system with all the default settings. When setting up a production implementation, you need to take more care in choosing the correct settings. The following is a screenshot of the IIS step when this check box is unchecked :
Once you click the ‘Next’ button, the "Audit log information" step displays.
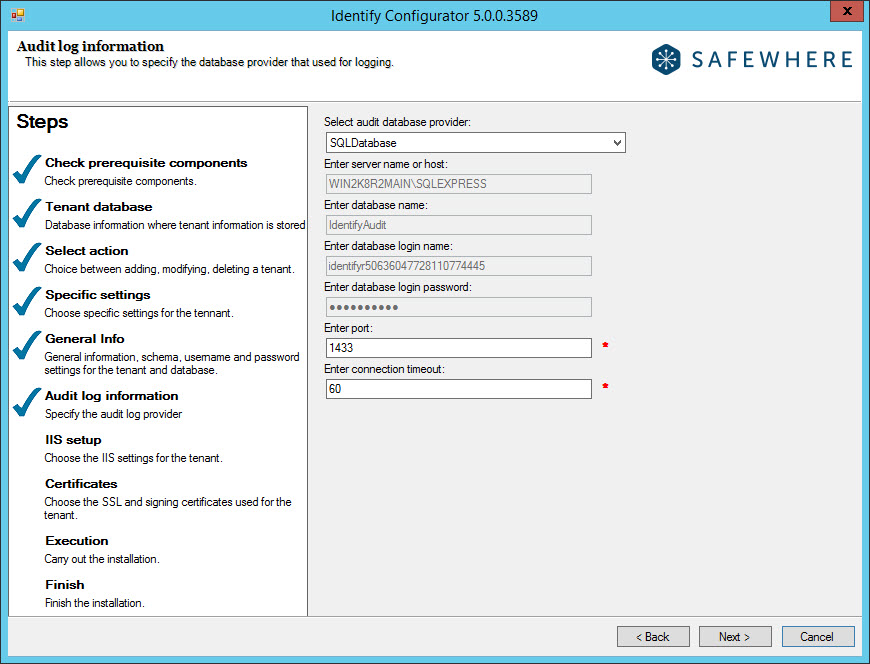
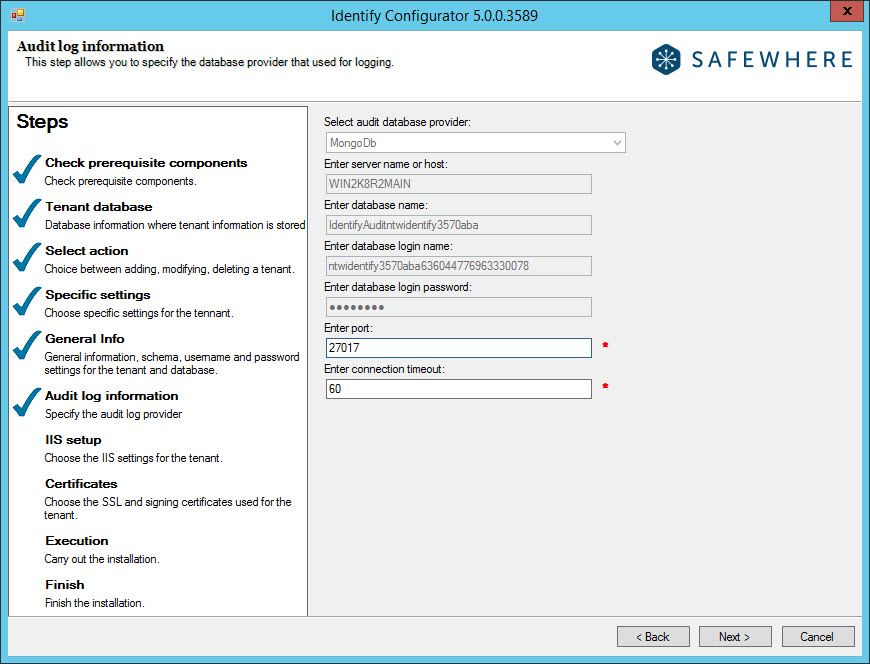
In this step, the user can either use MSSQLServer or MongoDB to store the audit data.
- Select audit database provider: Either select MSSQLServer or MongoDB.
- Enter server name or host: Fill in the database server name or IP address.
- Enter database login name: Fill in the username to log in to the database server or use the default value generated by the Configurator (only for MongoDB).
- Enter database login password: Fill in the username to log in to the database server or use the default value generated by the Configurator (only for MongoDB)
- Enter database name: This is read-only and is generated by the Configurator.
- Enter port: Fill in the port to connect to the database server or use the default value generated by the Configurator.
- Enter connection timeout: Fill in the timeout for connection to the Audit database or use the default value generated by the Configurator.
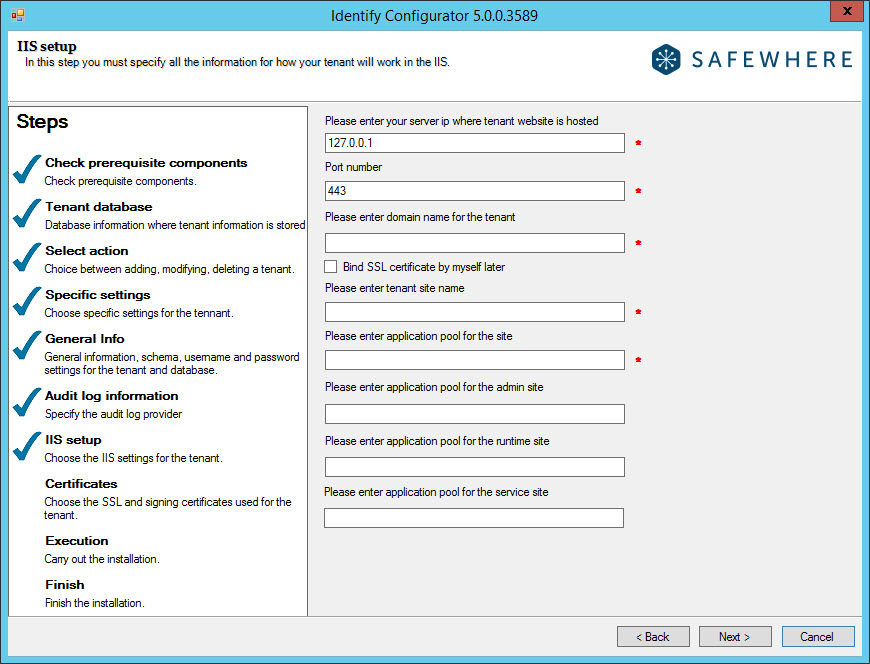
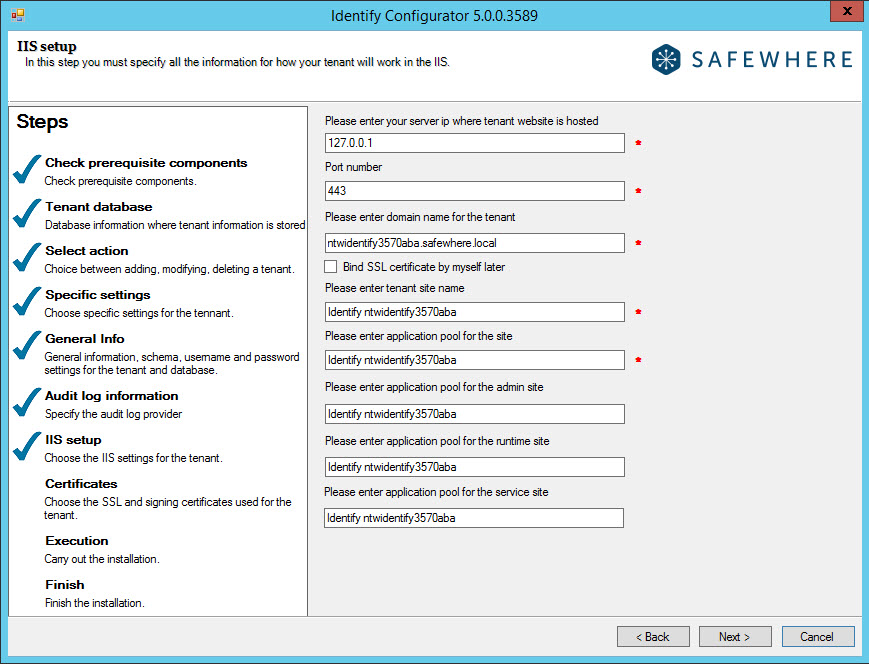
You are now ready to specify settings in IIS, regarding how the tenant is to be set up:
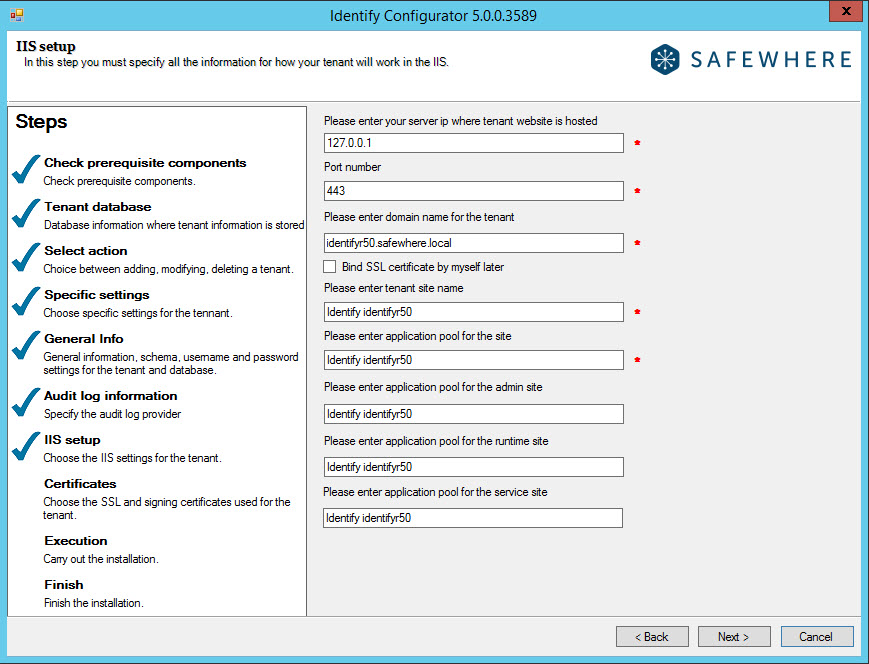
Server IP: Enter the unique IP address on which the tenant’s sites (admin, runtime, and service) will be hosted.
Port number: Specify the port number of the server of which the tenant’s sites (admin, runtime, and service) will be hosted.
Domain name: Specify the DNS domain where the tenant implementation is placed (thus, it’s the host name that is specified in the IIS Site Bindings property sheet). For example, if you set the domain to "test1.safewhere.local," then the federation login should be redirected to test1.safewhere.local and the admin website will be placed at https://test1.safewhere.local/admin.
Bind SSL certificate method: In order to bind the SSL certificate chosen in the earlier step up against the new sites, choose the first of the two offered options. If you want to make the binding in IIS later, choose the second option.
Tenant site name: Specify the name of the tenant site as it will be displayed in the IIS Manager MMC console. This is just for display and has no functional importance.
Site application pool: This setting is just a quick way to set the Application pools’ names for the admin, runtime, and service sites.
Admin site application pool: Specify the name of the admin site as it will appear in the application pool. It may be set to use the same application pool as the admin site.
Runtime site application pool: Specify the name of the runtime site as it will appear in the application pool. It may be set to use the same application pool as the runtime site.
Service site application pool: Specify the name of the service site as it will appear in the application pool. It may be set to use the same application pool as the service site.
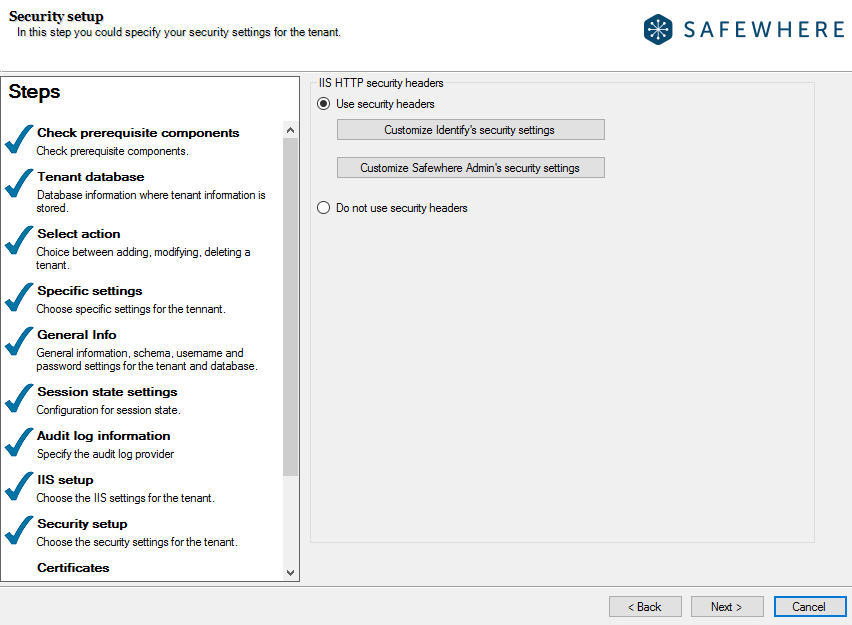
From version 5.5, you will have an option to enable the recommended HTTP Security Headers:
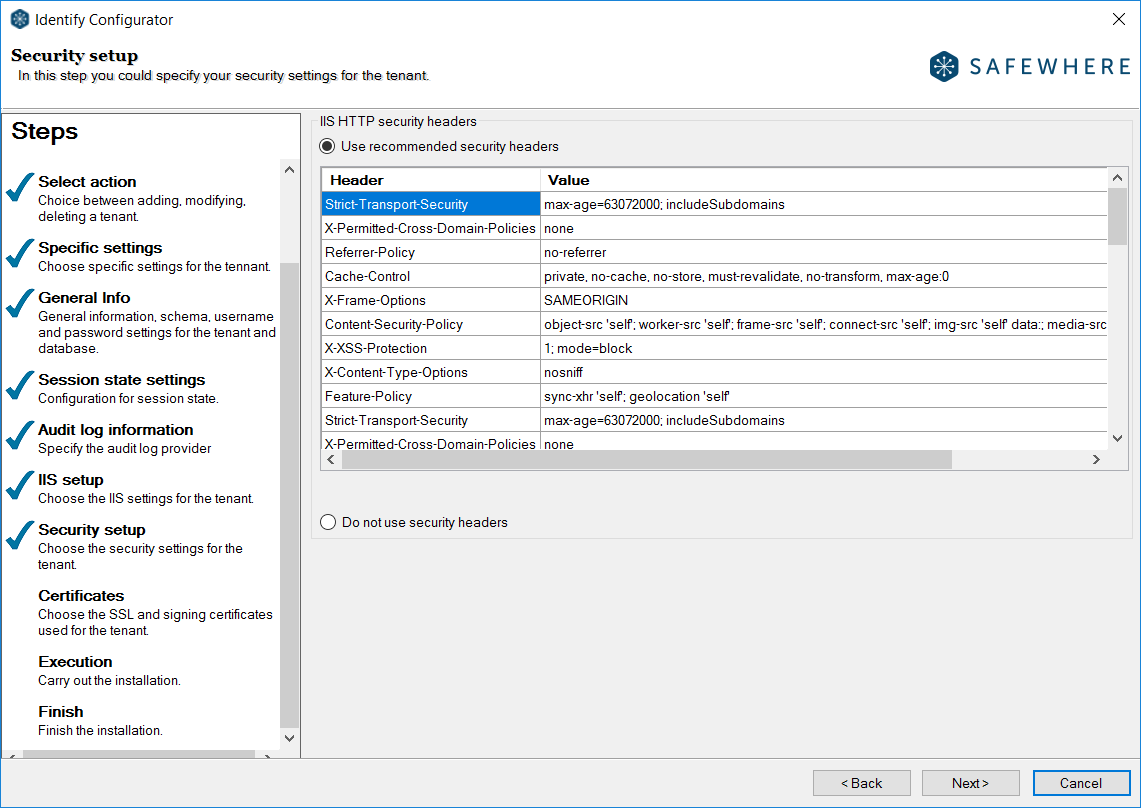
From version 5.12, you can customize security settings such as HTTP Security Headers, request filtering, and many others configuration settings for Internet Information Services(IIS):
Configure certifications of the wizard: You need to specify the certificates that will be used by Safewhere Identify to identify itself to external parties. There are two certificates that must be specified: the SSL certificate and the signing certificate. The SSL certificate is used to ensure secure transactions between web servers and browsers, whereas the signing certificate is used to sign federated requests and responses between Safewhere Identify and external Identity Providers and service providers.
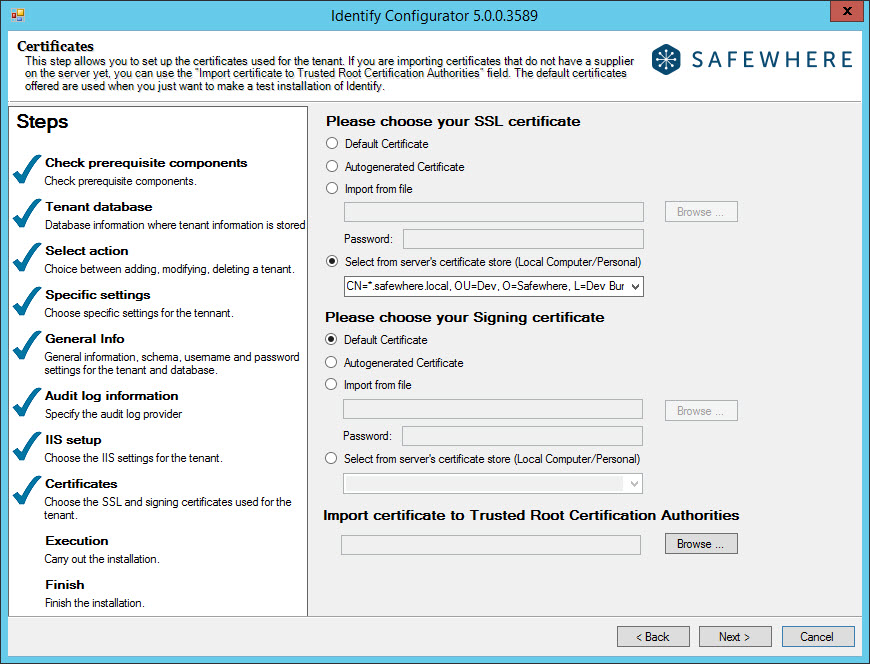
Default certificate: Safewhere Identify comes with default certificates, making it quick to set up for testing purposes. Because these certificates do not identify you as a unique user, please do not use them for actual production works.
Auto-generated certificate: Autogenerate is used for testing when Safewhere Identify is not set up using the installer, but rather set up manually.
Import from file: This option lets you import your certificate file to the server’s certificate store and apply it to the tenant.
Password: When importing a new certificate to your server’s certificate store, you will be required to specify its password in order to activate it.
Select from server’s certificate store: If the needed certificate is already stored in the server’s certificate store, you can choose it using this drop-down list.
Import certificate to Trusted Root Certification Authorities: This field is just a supporting field for uploading a root certificate, which identifies the other certificates as trustworthy (if this does not already exist on your server).
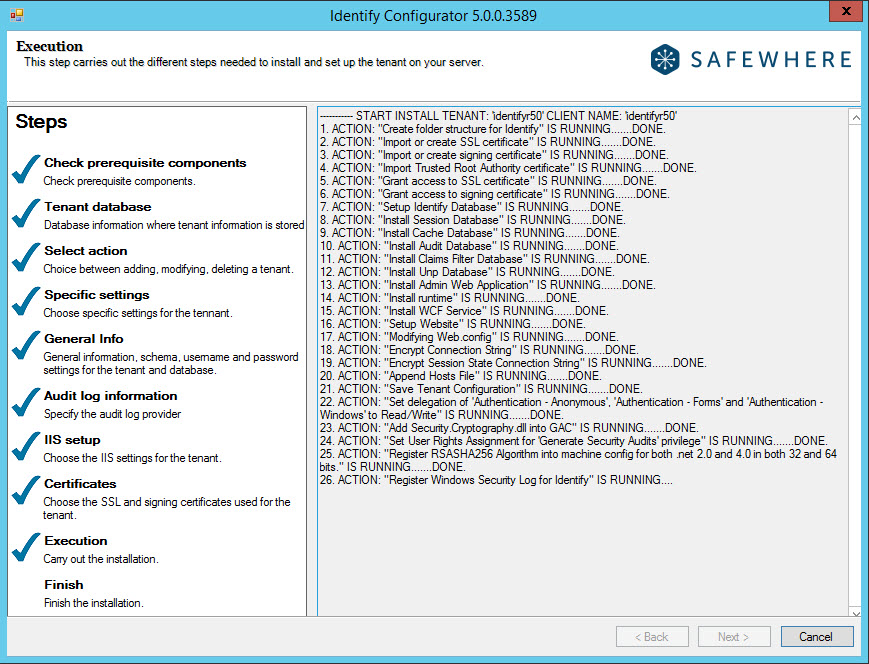
After clicking the Next button, you will reach the step where the installation is actually executed. Click the Next button again to start this process.
Default credential
After the Execution page, you have already reached the last step. A direct link is provided here for immediate access to the Identify*Admin site of the new tenant. The default credential for accessing the admin page is as follows:
Username: admin
Password: Test!234
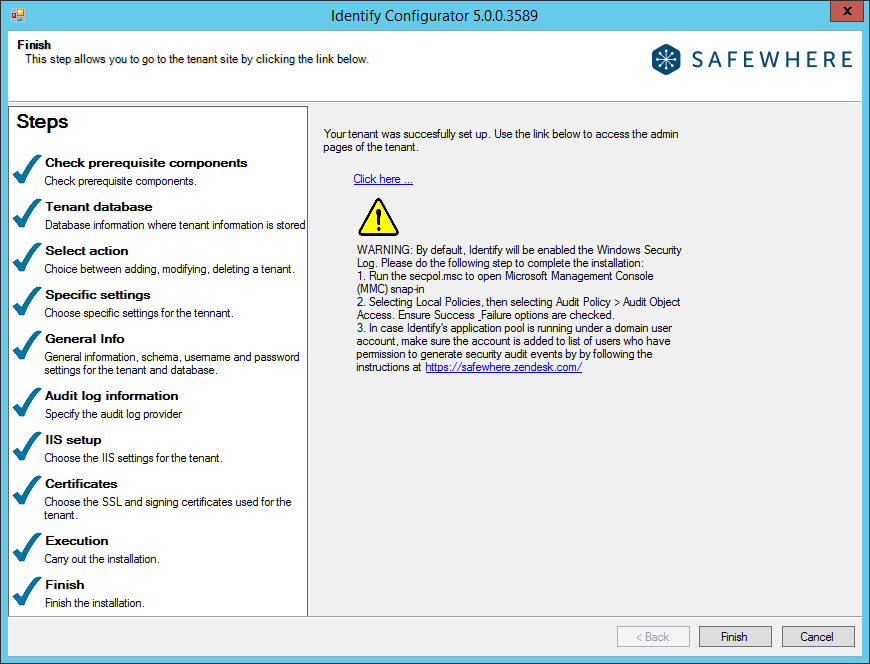
Since version 4.0, we have enabled the Windows security log. Users need to follow the proposed steps specified here before logging in to the tenant for the first time.
Besides, we improve the backup and rollback feature on the Identify flow so in case something breaks during upgrading/created, the upgrading tenants will not die. You can find its more details at here
Tenant Replication
It is possible to install tenants in a load-balanced environment (on multiple servers) by simply running both installer and Configurator on another server. The following section specifies how tenant replication is done.
The general processing steps are the same as when creating a new tenant. However, you should be aware of a few constraints:
- Only tenants that have been upgraded to the newest installed version of Identify are shown in the Replicate drop-down list.
- When replicating a tenant using Windows Authentication as the database authentication type, you are presented with the following message after choosing the language and the client name.
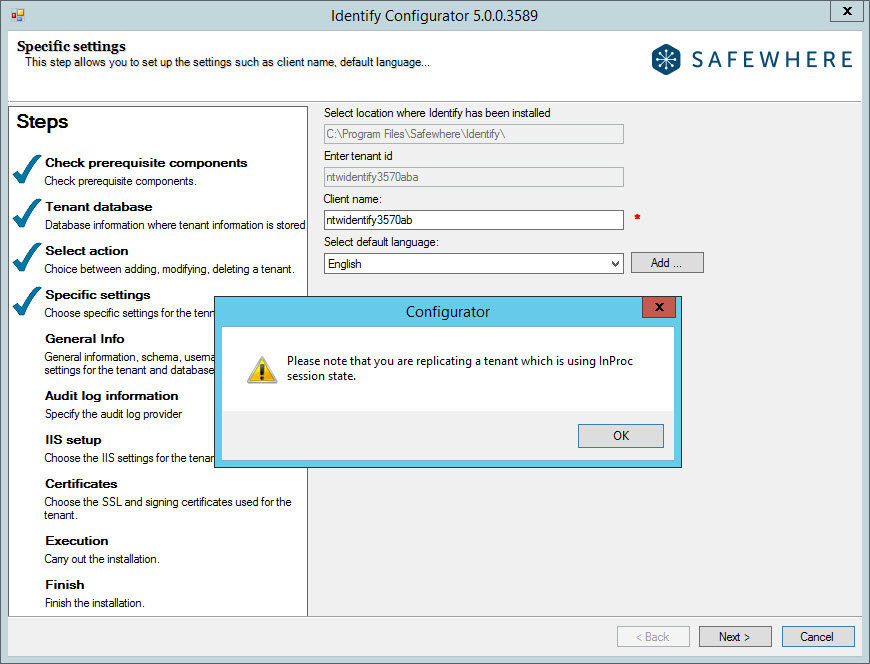
- When replicating a tenant using Inproc as Session State, you are presented with the following message after choosing the language and the client name.
- At the General Info step, all information of the tenant being replicated will be loaded. In the case that the database authentication type is set to Windows Authentication, you will need to input the password for the user login for the replicated server.
- At the Audit log information step, just click the Next button to go to the next screen.
- At the IIS setup step, specify the same domain name as used by the tenant being replicated.
- At the Certificates step, specify the same SSL certificate and the same signing certificate as used by the tenant being replicated.

The remaining steps are the same as when creating a new tenant.
Tenant Upgrade
From the version 5.0++, we support the feature: Identify database backup before the tenant upgrade is executed.
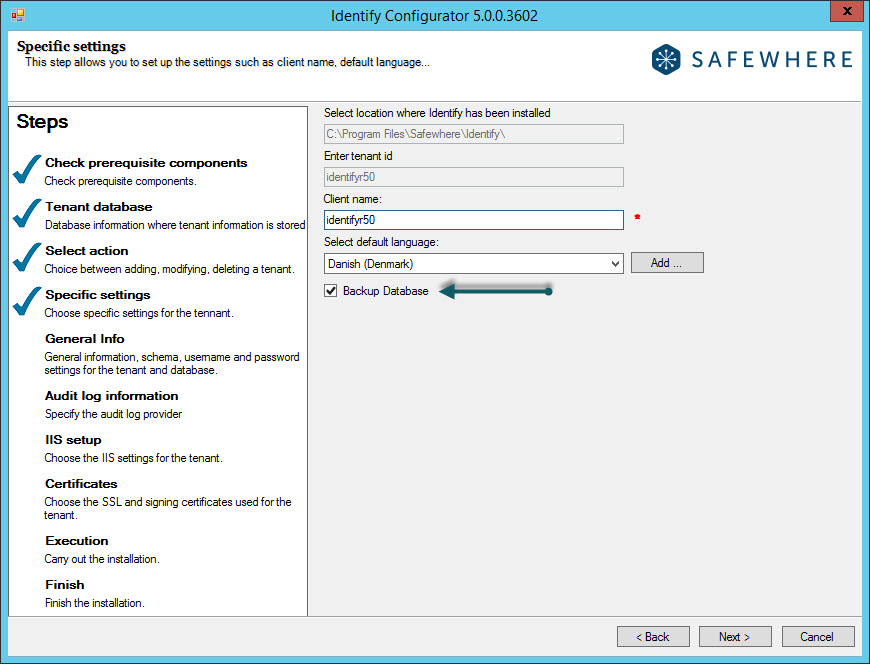
When this setting is enable, we will handle the Identify database backup at the 16th step on the upgrading process. This backup will be stored at the folder"Backup" of the SQL server location on the database server, e.g If you are using the SQL Server 2014 C:\Program Files\Microsoft SQL Server\MSSQL12.SQLEXPRESS\MSSQL\Backup
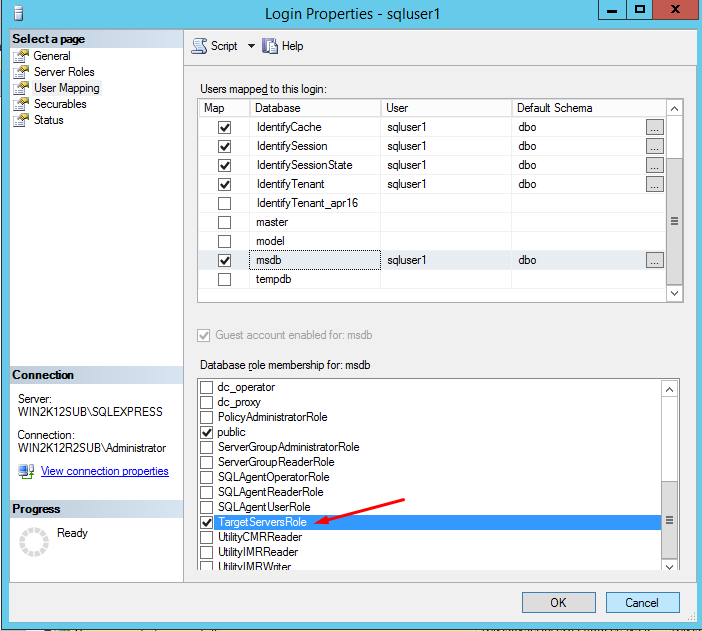
For the user context who will be in used for this database backup, he is selected at the step:
And to do the backup permission, he must fulfill the following:
-
If his server role is sysadmin, he can do the database backup as well as run the transaction.
-
If his server role is public and he 's got access to database as db_owner, he must have the access to the msdb on User Mapping with the TargetServerRole
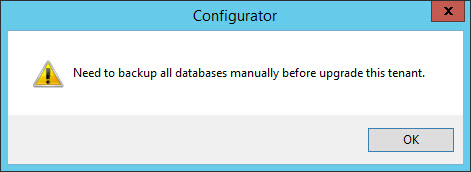
Note: If the in-use database is AzureSQL, the option "Backup database" is not available and user gets this message when choosing the tenant upgrade:
Excellent article, very informative!
Comment by Mike — July 1, 2015 @ 6:17 am
Extremely helpful!
Comment by Khoa — July 1, 2015 @ 6:18 am